

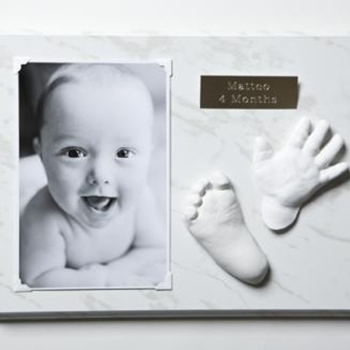
Description
The kit includes :
- 1 instruction sheet
- 1 wall mounted plaque 24 cm x 30 cm 9x12
- 1 moulding paste 250g (1/2 pds)
- 1 finishing plaster 250g (1/2 pds)
- 1 paper container to measure the plaster, 30 ml (1 ounce)
- 1 paper container to measure the water, 30 ml (1 ounce)
- 1 paper container to mix 150 ml (5 ounces)
- 1 stick to mix
- 1 stick of glue
- 1 inscription plate
- 4 adhesive picture corners
Using the kit, step by step
Choose the kitchen as your working space where you have access to water and a clean counter. It will be also easier to clean up afterward!
For your safety, wear a mask, gloves and glasses when handling of the plaster and the glue.
1- How to prepare your moulding paste : its temperature should be at least 22 degrees Celsius, 70 F. Start by lightly moulding the paste to make it softer (30 seconds). The heat generated by your hands will largely contribute to making the paste warmer.
2- Make an oval flat shape of 2.5 cm (1 inch) in height and rest it in a plat. Shape it into an oval form for the feet or into a round form for the hands. The pedestal should be wide enough to receive a childs foot or hand and be at least 1cm ( ¼ inch) wider..
3- To mould a babys foot or hand : Hold the baby in your arms. Take the ankle or wrist of the baby and press it on the paste to leave a print. The print should be 1 to 2 cm deep (1/4 to ½ inch). If you are not satisfied with the result, you may repeat the exercise by referring to step 1. Wash your baby after the process is finished. Keep the paste wrapped between usage. The paste will last over a year if its placed in the refrigerator, not in the freezer.
4- Filling the mould with plaster : fill one mould at a time. Use a 30 ml (1 once) paper container to measure and mix 2 parts of plaster with 1 parts of water in your 150 ml (5 ounces) paper container. Stir lightly using the stick, without making bubbles, for 60 seconds. Make sure the plaster is well dissolved in the water. Pour the mixture into the mould and let it dry for 60 minutes at room temperature. Once unmolded, let it dry for 3 days before proceding at the finishing. Coloring tip: at the plaster mixing stage, add 10 drops of food coloring.
5- To stick the finished product on the wall mounted plaque : Lay flat the frame on a table. Use the left hand side or right hand side at your choise for your moulding and for your picture. Figure it out before, than apply the glue on the flat side of the moulding and also on the frame where you wish to place it. Let dry separately for 1 minute and then place the mould on the frame. Pell the adhesive picture corners before fixing your picture in place. Let dry for 24 hours. Fill in the inscription plate with the babys name and information, (engravable at a trophy shop). Glue it on your frame and enjoy the final results!
Reviews
There are no reviews yet.